PHP多版本共存:php5.6与php5.5共存

续:
php多版本共存,需要使用php-fpm来运行php方便,这样更方便配置和管理
准备工作:
创建PHP5.6的相关目录,不要与已安装的php5.5的目录相同

mkdir /alidata/server/php56  安装目录 
mkdir /alidata/server/php56/etc      配置文件存放目录

源码包下载:

wget http://cn2.php.net/distributions/php-5.6.30.tar.gz

解压,编译安装php

tar xvf php-5.6.30.tar.gz
cd php-5.6.30
所有配置参数与上一个php5.5的完全相同,只有安装的目录和配置文件目录不同。
./configure \
--prefix=/alidata/server/php56 \
--with-config-file-path=/alidata/server/php56/etc \
--with-apxs2=/alidata/server/httpd/bin/apxs \
--with-libdir=lib64
--enable-inline-optimization \
--disable-debug \
--disable-rpath \
--enable-shared \
--enable-opcache \
--enable-fpm \
--with-fpm-user=www \
--with-fpm-group=www \
--with-mysql=mysqlnd \
--with-mysqli=mysqlnd \
--with-pdo-mysql=mysqlnd \
--with-mssql=/usr/local/freetds \
--with-pdo-dblib=/usr/local/freetds \
--with-gettext \
--enable-mbstring \
--with-iconv \
--with-mhash \
--with-openssl \
--enable-bcmath \
--enable-soap \
--with-libxml-dir \
--enable-pcntl \
--enable-shmop \
--enable-sysvmsg \
--enable-sysvsem \
--enable-sysvshm \
--enable-sockets \
--with-curl \
--with-zlib \
--enable-zip \
--with-bz2 \
--with-gd \
--without-sqlite3 \
--without-pdo-sqlite \
--with-pear \
--with-mcrypt \
--with-freetype-dir=/usr/local/freetype.2.1.10 \
--with-jpeg-dir=/usr/local/jpeg.6

make && make install

若编译安装时遇到如下错误

/usr/local/src/php-5.3.10/ext/xmlrpc/libxmlrpc/encodings.c:73: undefined reference to `libiconv_open’ /usr/local/src/php-5.3.10/ext/xmlrpc/libxmlrpc/encodings.c:81: undefined reference to `libiconv’ /usr/local/src/php-5.3.10/ext/xmlrpc/libxmlrpc/encodings.c:101: undefined reference to `libiconv_close’ collect2: ld returned 1 exit status make: *** [sapi/fpm/php-fpm] 错误
在执行完 ./configure … 之后,修改下 Makefile,找到其中的
EXTRA_LIBS = -lcrypt -lz -lcrypt -lrt -lmysqlclient -lmcrypt -lldap -llber -lfreetype -lpng -lz -ljpeg -lcurl -lz -lrt -lm -ldl -lnsl -lrt -lxml2 -lz -lm -lssl -lcrypto -ldl -lz -lcurl -ldl -lgssapi_krb5 -lkrb5 -lk5crypto -lcom_err -lidn -lssl -lcrypto -lz -lxml2 -lz -lm -lssl -lcrypto -ldl -lz -lxml2 -lz -lm -lxml2 -lz -lm -lcrypt -lxml2 -lz -lm -lxml2 -lz -lm -lxml2 -lz -lm -lxml2 -lz -lm -lcrypt
在最后面添加 -liconv ,修改后如下
EXTRA_LIBS = -lcrypt -lz -lcrypt -lrt -lmysqlclient -lmcrypt -lldap -llber -lfreetype -lpng -lz -ljpeg -lcurl -lz -lrt -lm -ldl -lnsl -lrt -lxml2 -lz -lm -lssl -lcrypto -ldl -lz -lcurl -ldl -lgssapi_krb5 -lkrb5 -lk5crypto -lcom_err -lidn -lssl -lcrypto -lz -lxml2 -lz -lm -lssl -lcrypto -ldl -lz -lxml2 -lz -lm -lxml2 -lz -lm -lcrypt -lxml2 -lz -lm -lxml2 -lz -lm -lxml2 -lz -lm -lxml2 -lz -lm -lcrypt -liconv

配置php-fpm

拷贝配置文件,在安装目录里
cd /alidata/server/php56/etc
cp php-fpm.conf.default php-fpm.conf 
修改配置文件
vim php-fpm.conf
将listen = 127.0.0.1:9000 改为listen = 127.0.0.1:9056
与php5.59000端口区别开,防止端口冲突

拷贝服务脚本,在源码包里
# cp sapi/fpm/init.d.php-fpm /etc/init.d/php56-fpm
# chmod +x /etc/init.d/php56-fpm
# chkconfig --add php56-fpm

启动php-fpm

 service php56-fpm start
 监听端口为:9056

nginx 切换php版本只需修改nginx.conf即可
php5.5 php-fpm 监听端口为:9000
php5.6 php-fpm监听端口为:9056

vim /etc/nginx/nginx.conf
将fastcgi_pass   127.0.0.1:9000;修改为
  fastcgi_pass   127.0.0.1:9056;
  重启nginx,打开phpinfo

apache切换PHP版本:
由于之前是用php mod来运行php,php作为apache的一个模块来运行。如果想要使用多版本切换,就不能再用php mod来运行了,必须要用php-fpm运行,然后和Apache关联。

修改配置文件

vim /etc/httpd/httpd.conf

首先注释掉以下内容(这是用php mod与PHP关联的)

#LoadModule php5_module modules/libphp5.so
#<FilesMatch \.php$> 
   #SetHandler application/x-httpd-php
#</FilesMatch>

然后去掉以下两行的注释,开启代理功能

LoadModule proxy_module modules/mod_proxy.so
LoadModule proxy_fcgi_module modules/mod_proxy_fcgi.so

再添加下面内容,使用php-fpm与PHP关联

<FilesMatch \.php$>
         SetHandler "proxy:fcgi://127.0.0.1:9056"
</FilesMatch>

重启apache服务,成功切换为php5.6
致此全部完成,nginx和apache全都可以正常切换PHP版本

WampServer死活连不上SQLServer的解决办法

下载了Wamp Server 2.5,连接MSSQLServer 2008 R2,一直提示“Fatal error: Call to undefined function sqlsrv_connect()”。

网上的办法全都试过也还是不管用(包括ext目录中添加dll、php.ini添加dll设置、ntwdblib.dll加入system32等等)。

如果遇到类似以上问题并且山穷水尽的同学,可以往下看。

首先在此感谢解决原作者:https://blog.csdn.net/xocom/article/details/45840725

下面开始说问题原因和方法。

原因:

经测试,微软最新发布的microsoft Drivers 3.1 for PHP for SQL Server仅支持32位的php5.5版本,在win7 64位系统中安装32位wamp环境可以正常开启扩展,但是安装了64位的wamp环境就不能开启扩展,网上查发现很多人反应64位的扩展源码编译不出来。

也就是说,微软发布的DLL扩展在64位的wamp中不能用

解决办法:

下载以下安装包,找到x64目录中对应的DLL,放到你的php/ext目录下。

地址一:http://oa.jnszkj.com/ueditor/php/upload/file/20180622/1529665745721557.zip

地址二:http://www.weka.cc/ueditor/php/upload/file/20180622/1529665745721557.zip

再次感谢原作者!感谢CSDN!感谢百度!微软就不谢了。

网页加载慢浏览器端分析方法

  1. 打开Chrome浏览器,访问要分析的网页
  2. 按下F12键,或在页面上点击右键选择“检查元素”
  3. 弹出的面板中,点击Network标签,选中里面的“Disable Cache”选项(目的是禁用缓存,否则不能体现首次访问加载所有资源的情况)
  4. 刷新网页,面板左下角会显示加载页面共请求了多少资源,共耗费多少时间,共使用了多少流量。并以表格形式显示出所有的网络资源请求,每一行一个,每行都包括请求该资源所耗费的时间、资源大小等信息。
  5. 下一步进行分析,主要从两个方面,一是请求时间,二是资源大小。
  6. 对于请求时间特别长的资源,可以看下是否该资源为国外资源,因为被墙导致访问时间长。
  7. 点击Size,按资源大小进行倒序排列,找到占用空间大的资源。

ERR: SOAP-ERROR: Parsing WSDL: Couldn’t load from XXX解决方案

原文链接:http://myitlife.blog.51cto.com/2289784/1529621

PHP在用SOAP协议做接口的时候,经常会碰到如下问题,不是不成功,而是偶尔不成功,实在让人费解!

ERR: SOAP-ERROR: Parsing WSDL: Couldn’t load from ‘http://www.xxxxx.com/member/member_sync.php?wsdl’ : failed to load external entity “http://www.xxxxx.com/member/member_sync.php?wsdl”

查找日志发现:

NOTIC: [2] SoapClient::SoapClient(): I/O warning : failed to load external entity “http://www.xxxxx.com/member/member_sync.php?wsdl” /home/wwwroot/default/xxxxx.com/App/Modules/Admin/Action/OrderAction.class.php 第 112 行.客户端$client = new SoapClient ( $url );创建SoapClient对象时出错!

网上查找很多资料,有开启selinux、关闭soap缓存、开启openssl等等答案,但尝试过后都不尽人意,现终极解决办法:

只需把php的客户端SoapClient的wsdl模式修改为non-wsdl模式,即可解决!

wsdl模式:

$url = “http://xxxxx.org/member/member_sync.php?wsdl”;

$client = new SoapClient ( $url );

non-wsdl模式:

$client = new SoapClient(null,array(‘location’=>’http://www.xxxxx.com/member/member_sync.php’,uri => ‘member_sync.php’));

Windows环境下安装phpunit

参考文章:http://blog.csdn.net/sunshinelyc/article/details/49834293#comments

进来由于工作需要,安装phpunit,在网上找了各种安装方法,pear添加phpunit通道安装,手动安装,各种失效,各种无语,皆因网上的资料都是年份比较久远的(也有可能本人不太了解phpunit的工作原理),导致安装了一个下午进展缓慢。最后在phpunit.de中看到了一篇文章,然后第二天再试着安装了一次,具体成功了(然后也对phpunit有了一个比较基础的了解)故此,记录一下本人安装phpunit的过程,方便自己和路人查阅,该文章仅作为本人查阅之用,故此希望网友看到了不要吐槽。。微笑

话不多说,直接开展。。。

首先,官网文档连接如下phpunit.de ,如果是由于年份久远导致无法连接的只能再找找资料了(再网上找资料的时候就碰到了一大推年份久远导致链接失效的情况。。。大哭,导致坑越来越深。。。)

安装步骤如下:

其实安装过程非常非常非常简单。。(注意用了三个非常,足以证明强调意义)

1、在官网下载phpunit.phar包,链接如下:phpunit.phar,下载和自己php版本对应的稳定包即可。(注意:这里是PHPUnit 的 PHP 档案包,它将 PHPUnit 所需要的所有必要组件(以及某些可选组件)捆绑在这个文件中)

2、创建一个文件夹,这里我在d盘创建了phpunit,路径为D:\phpunit,将该路径添加到path环境变量中,然后将下载好的phpunit.phar放到该文件夹中

3、打开一个cmd窗口,按照如下执行(每个人的cmd路径不一样,不要对号入座。。):

C:\Users\Administrator>d:

D:\>cd phpunit

D:\phpunit>echo @php “%~dp0phpunit.phar” %* > phpunit.cmd

D:\phpunit>exit

4、重新打开一个新的cmd窗口,在cmd中执行执行phpunit –version

C:\Users\Administrator>phpunit –version
PHPUnit 4.8.18 by Sebastian Bergmann and contributors.

这样子就表示你的phpunit已经安装完成了。。是不是超级简单。。不到半个小时就搞定的事情,我昨天研究了一个下午。。也是够蠢的。。。(不要局限于用pear安装。安装方法各种各样。结果达到就行。。),暂时介绍安装。后续继续补充phpunit的学习过程,毕竟这东西,才有一点点概念。至于怎么使用。原理是什么还是一头雾水。。

Zend Framework单元测试方法

Update: Things are all change in Zend Framework 1.8, so this may require some adaptation in that version.

If you’ve followed the Zend Framework quickstart tutorial like me, you may be wondering how to perform unit testing using it. The tutorial does set up the bootstrap file to allow for unit testing, but does not cover unit testing itself. The aim of this post is to  provide a quick guide to unit testing using the quickstart application, which will hopefully come in useful for a few people and myself when I inevitably forget this later on.

Step 0: Before Starting

First, you should download and set up the guestbook application from the Zend Framework website. Make sure you place the Zend library in the library folder and enable the read/write permissions for the sqlite database and the db directory for access by the web server.

You will also want to install pear and, with it, install PHPUnit:

pear channel-discover pear.phpunit.de

pear install phpunit/PHPUnit

Step 1: Create Test Folders

Create a folder called “tests” in the root folder of the application. Inside that create a folder called “controllers” and “models”. The  directory structure should be as follows:

zendquickstart
|-- application
|-- data
|-- library
|-- public
|-- scripts
`--tests
 |-- controllers
 `-- models

All your controller tests should go in the controllers folder, all your model tests should go in the models folder.

Step 2: Create Test Configuration

Create the file TestConfiguration.php in the tests folder. This file will initially set up the testing configuration, inside place the following code:

1
2
3
4
5
6
7
8
9
10
11
12
13
14
15
16
17
18
19
20
21
22
23
24
25
26
27
28
29
30
31
32
33
34
35
36
37
38
<?php
// Gets called when this file is included/required
TestConfiguration::setUp();

class TestConfiguration
{
    /**
    * Sets the environment up for testing
    */
    static function setUp()
    {
        // Set the environment constant to testing which will load the testing
        // configuration in app.ini by the bootstrap
        define('APPLICATION_ENVIRONMENT', 'testing');

        // Set the include path for locating the Zend library
        set_include_path(realpath(dirname(__FILE__)) . '/../library'
            . PATH_SEPARATOR . get_include_path());

        // Use Autoload so that we don't have to include/require every class
        require_once "Zend/Loader.php";
        Zend_Loader::registerAutoload();
    }

    static function setUpDatabase()
    {
        require '../application/bootstrap.php';

        $db = Zend_Registry::get('configuration')->database->params->dbname;

        // delete any pre-existing databases
        if(file_exists($db)) unlink($db);

        // run the database set up script to recreate the database
        require '../scripts/load.sqlite.php';
    }
}
?>

The setUp() function in this class will get called when the file is included or required. The APPLICATION_ENVIRONMENT constant is set to ‘testing’ so that the testing section of the app.ini file is read in the bootstrap, and the testing database is used. A testing database should be used so that testing does not interfere with the production or development databases, and no important  data is lost. The next step is to set the include path, which should contain the location of the Zend Framework library. The final step is to enable the Zend autoloader so that we don’t have to explicitly require/include the Zend libraries.

The setUpDatabase() function resets the database to a known state. When the tests are run we may wish to insert data to the database and this should be removed before every new test. We require the bootstrap file so we can get the database configuration and delete the database file, which is an easy way to reset an SQLite database. A different method will be necessary for other databases like MySQL or PostgreSQL. Finally, the setUpDatabase() function uses a script which comes with the quick start application to (re)create the database.

Step 3: Creating Controller Tests

To test the IndexController, create the file IndexControllerTest.php in the tests/controller directory. The following is a simple example:

1
2
3
4
5
6
7
8
9
10
11
12
13
14
15
16
17
18
19
20
21
22
23
24
25
26
27
28
29
30
31
32
33
34
35
36
37
<?php
// Set up the testing environment
require 'TestConfiguration.php';

class controllers_IndexControllerTest extends Zend_Test_PHPUnit_ControllerTestCase
{
    // Bootstraps the application
    public $bootstrap = '../application/bootstrap.php';

    public function testHomePageIsASuccessfulRequest()
    {
        // Runs the test on /, the homepage
        $this->dispatch('/');

        // Tests there are no exceptions on the home page
        $this->assertFalse($this->response->isException());

        // Tests for redirection to the error handler
        $this->assertNotRedirect();
    }

    public function testHomePageDisplaysCorrectContent()
    {
        // Runs the test on /
        $this->dispatch('/');

        // Tests the page title is present
        $this->assertQueryContentContains(
            'div#header-logo',
            'ZF Quickstart Application'
        );

        // Tests the guestbook link is present
        $this->assertQueryContentContains('a', 'Guestbook');
    }
}
?>

This is a very basic controller test. First note that you should extend Zend_Test_PHPUnit_ControllerTestCase for controller tests. This class extends PHPUnit_Framework_TestCase itself, but adds some assertions and other things specific to Zend Framework.

The bootstrap instance variable must be set in order to test the controller, and in this case it points to the location of the bootstrap file.

The testHomePageIsASuccessfulRequest() test is used to test that the homepage functions correctly; it should not contain any exceptions or redirect to the error controller. If it does then there is a problem somewhere and the test fails. The testHomePageDisplaysCorrectContent() is used to test that the page title and the link to the guestbook is present.

Step 4: Creating Model Tests

To test the GuestBook model, create the file GuestBookTest.php in tests/models.

1
2
3
4
5
6
7
8
9
10
11
12
13
14
15
16
17
18
19
20
21
22
23
24
25
<?php
require 'TestConfiguration.php';
require '../application/models/GuestBook.php';

class models_GuestBookTest extends PHPUnit_Framework_TestCase
{
    public function setUp()
    {
        // Reset database state
        TestConfiguration::setUpDatabase();
    }

    public function testFetchEntries()
    {
        // Instantiate the GuestBook model
        $guestBook = new Model_GuestBook();

        // Get all entries from the database
        $entries = $guestBook->fetchEntries();

        // Test that there are 2 entries in the guestbook
        $this->assertSame(2, count($entries));
    }
}
?>

Again, this is very basic. The setUp() function gets called by PHPUnit before the test is run, and it will reset the database. The testFetchEntries() function tests the fetchEntries() function in the model. Two rows in the guestbook table should be present, therefore there should be two elements in the array returned by fetchEntries().

Step 5: Edit load.sqlite.php

You may find it annoying to have to wait 5 seconds between model tests when the database is recreated. I worked around this problem by making a small change to the PHP script which loads the database schema:

1
2
3
4
5
6
7
8
9
<?php
if (APPLICATION_ENVIRONMENT != 'testing')
{
    echo 'Writing Database Guestbook in (control-c to cancel): ' . PHP_EOL;
    for ($x = 5; $x > 0; $x--) {
        echo $x . "\r"; sleep(1);
    }
}
?>

If the application environment is not testing then the timeout should not be displayed. You may prefer to simply remove the timeout altogether. Additionally, you will need to change the lines that locate the SQL files to include dirname(FILE):

1
2
3
4
<?php
$schemaSql = file_get_contents(dirname(__FILE__) . '/schema.sqlite.sql');
$dataSql = file_get_contents(dirname(__FILE__) . '/data.sqlite.sql');
?>

Step 6: Running the Tests

To run the tests, navigate to the tests directory in a terminal/CMD, and type phpunit controllers_IndexControllerTest and models_GuestBookTest to test the IndexController and GuestBook model, respectively.

phpunit controllers_IndexControllerTest

PHPUnit 3.3.14 by Sebastian Bergmann.

..

Time: 0 seconds

OK (2 tests, 4 assertions)

phpunit models_GuestBookTest

PHPUnit 3.3.14 by Sebastian Bergmann.

Database Created

Data Loaded.

.

Time: 0 seconds

OK (1 test, 1 assertion)

Conclusion

There you have it. This isn’t necessarily the only way or the best way to perform unit testing, this is merely the way I got it to work with the quickstart application having had no prior experience with PHPUnit. Any suggestions or improvements are welcome.
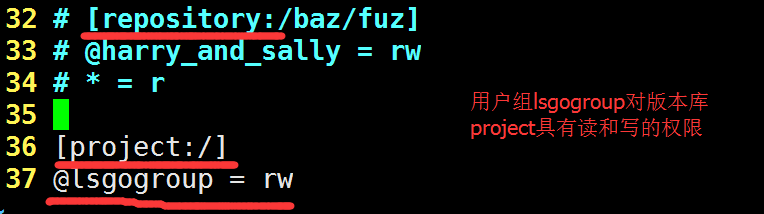
Credits

I based this on the Zend Framework manual and the book Zend Framework in Action.

Visual Studio内置IIS服务器如何允许局域网内其它电脑远程访问?

参考文章:http://blog.csdn.net/zhangjk1993/article/details/36671105

用Visual Studio启动网站后,仅支持本地调试访问,其它电脑访问会报Invalid Hostname 400等错误。如何解决呢?

  1. 在VS中启动网站后,屏幕右下角会出现IIS Express的托盘图标。
  2. 点击托盘,选择查看所有,点击列表中的该网站,即可看到下方提示中包含一项applicationhost.config及该文件的位置。
  3. 找到该文件进行编辑, 找到<binding protocol=“http” bindingInformation=“*:8080:localhost” />,将localhost改为本机的IP即可,比如192.168.1.110,或者改为*。
  4. 在VS中重新启动网站。

Centos7上搭建SVN服务器并实现自动同步至web目录

前言

由于最近跟学长一起合作完成一个小项目,然后我俩比较熟悉的版本控制是SVN,就考虑着在服务器上搭建一个SVN服务器。现在在这里给出简单的搭建过程。
(其实吧,能用Git就尽量用git吧,好处自己百度,有关搭建请参考我的另一篇博客搭建服务器上的GIT并实现自动同步到站点目录(www),这篇博客与git搭建的过程应该是基本一样的)

预期目的:

1、仓库放在 /var/svn/ 目录下,并且仓库名为 project

2、创建用户组lsgogroup,该组下添加两个成员lsgoweb1、lsgoweb2,密码直接用用户名,两用户可以checkout代码和提交代码

3、利用SVN的钩子实现当仓库的代码更新的时候自动同步至我们的web目录,在这里,我的web目录在 /home/www/ 下

一、搭建svn环境并创建仓库:

1、安装Subversion:

yum install -y subversion

2、检测是否安装成功(查看svn版本号)

svnserve --version

3、创建版本库

//先建目录
mkdir /var/svn
cd /var/svn
//创建版本库
svnadmin create /var/svn/project
cd project
//会看到自动生成的版本库文件
conf  db  format  hooks  locks  README.txt

至此,svn环境搭建成功。

二、创建用户组及用户:

1、 进入版本库中的配置目录conf,此目录有三个文件: svn服务综合配置文件(svnserve.conf)、 用户名口令文件(passwd)、权限配置文件(authz)。

2、修改权限配置文件:vim authz

3、配置用户名命令文件:vim passwd

4、配置SVN服务综合配置文件svnserve.conf

//找到以下配置项,将前面的#号去掉,然后做相应的配置
anon-access = none  //匿名用户访问权限:无
auth-access = write     //普通用户访问权限:读、写
password-db = passwd        //密码文件
authz-db = authz        //权限配置文件
realm = /var/svn/project    //版本库所在1

注意:所有以上的配置项都需要顶格,即前面不能预留空格,否则报错

5、启动svn服务:

svnserve -d -r /var/svn

如果提示:

svnserve: E000098: Can't bind server socket: Address already in use

证明现在svn已经被启动了,由于我们修改了配置文件,因此要重启svn服务

//查看svn服务详情
ps aux | grep svn
//将svn服务强制停止  其中790为svn服务的ID号,-9是kill的参数
kill -9 790

或者用

killall svnserve

再运行 svnserve -d -r /var/svn,进行启动服务

6、测试服务器:

//我们在web目录测试(/home/www)
cd /home/www
svn co svn://localhost/project

如果提示:Checked out revision 1.  表示checkout成功

我们添加新文件来测试是否提交成功

cd /home/www
touch index.php
svn add index.php   //成功的话会显示  A index.php
svn commit index.php -m "测试提交文件"

假如最后提示:

Adding         index.php
Transmitting file data .
Committed revision 2.

则表示我们svn服务器搭建成功!文件已经能够推送了。

7、本地拉取、推送

在本地首先要安装SVN吧,具体百度。。。

填写信息:

点击ok,提示输入用户名和密码

就填刚才我们创建的lsgoweb1或lsgoweb2,和对应的密码即可。

三、实现svn更新自动同步到web目录:

1、在web目录中checkout版本库

这一步算是比较关键的一步了,当时我搭建的时候试了无数次,就是缺少了这一步。把刚才checkout的版本库删掉,我们来一次比较正式的checkout:

svn co svn://localhost/project /home/www --username lsgoweb1(SVN账号) --lsgoweb1(SVN密码)

进入/var/svn/project/hooks下,建立post-commit文件:

cd /var/svn/project/hooks
vim post-commit

//在该文件里添加如下代码,保存
#!/bin/sh
#设定环境变量,如果没有设定可能会出现update报错
#设定语言,根据系统语言设置,如果是GBK就设置为 LANG=zh_CN.GBK
export LANG=en_US.utf8
SVN_PATH=/usr/bin/svn   //这里不用改
WEB_PATH=/home/www  //web目录,如果你的不同,可以改
//这里的用户随便一个就好
$SVN_PATH update $WEB_PATH --username 'lsgoweb1' --password 'lsgoweb1' --no-auth-cache

保存退出。

修改post-commit用户为www目录用户

chown apache:apache post-commit     //我的 /home/www 的用户组和所有者都是apache

给post-commit 执行权限:

chmod 755 post-commit

麻蛋,终于写完了。。。。

本博客主要参考了:  1、centos7.0搭建SVN服务器  2、CentOS创建SVN 服务器,并且设置自动同步到WEB目录  感谢原作者。

让PHP以ROOT权限执行系统命令的方法

原文地址:http://www.jb51.net/article/26232.htm

用来作为解决php以root权限执行一些普通用户不能执行的命令或应用的参考。
其实php里的popen()函数是可以解决这个问题的,但是由于某些版本的linux(如我使用的Centos 5)对系统安全的考虑,
使得这个问题解决起来麻烦了好多。先来看一个网友使用popen()函数的例子。

复制代码代码如下:
/* PHP中如何增加一个系统用户
下面是一段例程,增加一个名字为james的用户,
root密码是 louis。仅供参考
*/
$sucommand = “su root –command”;
$useradd = “/scripts/demo/runscripts.php”;
$rootpasswd = “louis”;
$user = “james”;
$user_add = sprintf(“%s %s”,$sucommand,$useradd);
$fp = @popen($user_add,”w”);
@fputs($fp,$rootpasswd);
@pclose($fp);

经过自己的测试,证实此段代码是不能实现(至少在我的系统里是这样的)作者想要获得的结果的。经过自己很长时间的google之后,
问题的关键是su root这个命令需要的密码必须以终端的方式输入,不能通过其它的方式(我也不知道还有没有其它的方式)获得。
又由于项目要求不能使用类似于sudo这种应用,无奈之下,我选择了网友提出的用编写C程序的方法来解决此问题。
首先写个C程序,命名为:run.c 放在目录/scripts/demo/下

复制代码代码如下:
#include <stdio.h>
#include <stdlib.h>
#include <sys/types.h>
#include <unistd.h>
int main()
{
uid_t uid ,euid;
//char cmd[1024]; //变量暂时未使用
uid = getuid() ;
euid = geteuid();
printf(“my uid :%u\n”,getuid()); //这里显示的是当前的uid 可以注释掉.
printf(“my euid :%u\n”,geteuid()); //这里显示的是当前的euid
if(setreuid(euid, uid)) //交换这两个id
perror(“setreuid”);
printf(“after setreuid uid :%u\n”,getuid());
printf(“afer sertreuid euid :%u\n”,geteuid());
system(“/scripts/demo/runscripts.php”); //执行脚本
return 0;
}

编译该文件:
gcc -o run -Wall run.c
在该路径下生成run文件,这个可执行文件。如果现在用PHP脚本调用 该run的话,即使setreuid了 也是不行的。
接下来要做的是:给run赋予suid权限
# chmod u+s run
# ls
# -rwsr-xr-x 1 root root 5382 Jul 2 21:45 run
好了,已经设置上了,再写一个php页面调用它。

复制代码代码如下:
<?php
echo ‘<pre>’;
$last_line = system(‘/scripts/demo/run’, $retval);
echo ‘
</pre>
<hr />Last line of the output: ‘ . $last_line . ‘
<hr />Return value: ‘ . $retval;
?>

在浏览器中浏览。
my uid :48
my euid :0
after setreuid uid :0
afer sertreuid euid :48

——————————————————————————–
Last line of the output: afer sertreuid euid :48
——————————————————————————–
Return value: 0
该命令执行成功。
从显示结果可以看出: apache(daemon)的uid 为48(事实上很多linux系统下daemon的uid为2)。
调用setreuid后将有效用户id和实际用户id互换了。(必须在chmod u+s生效的情况下) 使apache当前的uid为0这样就能执行root命令了。
只需要更改 C文件中的system所要执行的命令就可以实现自己的PHP以root角色执行命令了。

在玩C 以前 玩过一段时间的PHP, 哪个时候需要用PHP 来运行root命令,一直未果,直到有一天搜索到了super这个插件.
随着玩C的日子多了.发现可以用C语言来包裹 要运行的外部命令. 实验了一下.成功了.
不需要任何外部工具就可以实现用PHP 执行root命令.
我下面就把方法发布给大家,有需求用php来运行root命令的朋友可以不用发愁了.
平台:Linux. 实验命令iptables 当前的目录是/var/www/html/http
写程序的时候 用root用户
大家都知道iptables 非root用户不能运行.
首先写个C程序
命名为:ipt.c

复制代码代码如下:
#include <stdio.h>
#include <stdlib.h>
#include <sys/types.h>
#include <unistd.h>
int main()
{
uid_t uid ,euid;
uid = getuid() ;
euid = geteuid();
printf(“my uid :%u\n”,getuid()); //这里显示的是当前的uid 可以注释掉.
printf(“my euid :%u\n”,geteuid()); //这里显示的是当前的euid
if(setreuid(euid, uid)) //交换这两个id
perror(“setreuid”);
printf(“after setreuid uid :%u\n”,getuid());
printf(“afer sertreuid euid :%u\n”,geteuid());
system(“/sbin/iptables -L”); //执行iptables -L命令
return 0;
}

编译该文件 gcc -o ipt -Wall ipt.c
在该路径下生成ipt 这个可执行文件.
如果现在用PHP网页调用 该ipt的话,即使setreuid了 也是不行的.
接下来要做的是chmod u+s ./ipt
ls 一下
-rwsr-xr-x 1 root root 5382 Jul 2 21:45 ipt
s位已经设置上了.
再写一个php页面调用它.

复制代码代码如下:
<?php
echo ‘<pre>’;
$last_line = system(‘/var/www/html/http/ipt’, $retval);
echo ‘
</pre>
<hr />Last line of the output: ‘ . $last_line . ‘
<hr />Return value: ‘ . $retval;
?>

在浏览器中浏览.

[color=Red]Chain INPUT (policy ACCEPT)
target prot opt source destination
Chain FORWARD (policy DROP)
target prot opt source destination
ACCEPT all — anywhere anywhere state RELATED,ESTABLISHED
Chain OUTPUT (policy ACCEPT)
target prot opt source destination [/color]
[color=Blue]my uid :48
my euid :0
after setreuid uid :0
afer sertreuid euid :48[/color]

——————————————————————————–
Last line of the output: afer sertreuid euid :48
——————————————————————————–
Return value: 0

该命令执行成功..
众所周知: apache的uid 为48. 调用setreuid后 将有效用户id 和实际用户id互换了.(必须在chmod u+s生效的情况下) 使apache当前的 uid为0 这样就能执行root命令了。

大家只需要更改 C文件中的 system所要执行的命令就可以实现自己的PHP执行root命令了.

Linux下PHP开启Oracle支持(oci8)(补充pdo_oci)

原文地址:http://www.2cto.com/database/201412/364299.html

http://www.cnblogs.com/huangzhen/archive/2011/09/14/2176607.html

使用php的常见问题是:编译php时忘记添加某扩展,后来想添加扩展,但是因为安装php后又装了一些东西如PEAR等,不想删除目录重装,那么此时就需要自己重新增加某模块支持了,Linux操作系统下可以用phpize给PHP动态添加扩展.下面就以扩展模块 oci8为例(php连接oracle数据库需要改扩展支持)做简单的说明.(以下所有资源可以访问http://download.csdn.net/detail/haiqiao_2010/8294513 进行统一下载

1.下载Oracle客户端程序包,其中包含OCI、OCCI和JDBC-OCI等相关文件

1.1 根据Linux系统选择对应的软件,我的为32位系统,所以下载如下文件:

oracle-instantclient11.2-basic-11.2.0.3.0-1.i386.rpm

oracle-instantclient11.2-devel-11.2.0.3.0-1.i386.rpm

1.2下载地址: http://www.oracle.com/technetwork/database/features/instant-client/index-097480.html (Oracle官网下载需要注册用户)

2.安装oracle客户端,运行以下命令即可:


rpm -ivh oracle-instantclient11.2-basic-11.2.0.3.0.i386.rpm

rpm -ivh oracle-instantclient11.2-devel-11.2.0.3.0.i386.rpm

3.安装oci8 php扩展

3.1 下载oci8-1.4.10.tgz

下载地址:http://pecl.php.net/get/oci8-1.4.10.tgz

3.2 把下载文件上传至linux服务器,并进行解压

命令:tar zxvf oci8-1.4.10.tgz#解压

3.3 转到解压目录

命令:cd oci8-1.4.10

3.4 使用phpize准备 PHP 外挂模块的编译环境,会根据指定的环境变量生成编译时需要的makefile,phpize是属于php-devel的内容,所以centos下只要运行yum install php-devel进行安装即可 (注意:/usr/local/php/bin/phpize 为我的php目录,不同则需改之;如果是64位的系统,client改成client64)

/usr/local/php/bin/phpize CFLAGS=”-I/usr/lib/oracle/11.1/client” CXXFLAGS=”-I/usr/lib/oracle/11.1/client”

3.5 编译,安装


要有与现有php完全相同的php压缩包。我用的是php-5.5.3.tar.gz。展开后进入里面的ext/oci8目录下,

然后执行命令: /usr/local/php/bin/phpize #这是一个可执行的文本文件,要确保它在系统中

会发现当前目录下多了一些configure文件,

如果没报错,则运行命令;

./configure –with-php-config=/usr/local/php/bin/php-config –with-oci8=/usr/lib/oracle/11.1/client


注意要先确保/usr/local/php/bin/php-config存在。如果你的php安装路径不是默认的,要改。

再运行以下命令 ,然后它告诉你一个目录,你把该目录下的oci8.so拷贝到你php.ini中的extension_dir指向的目录中

make
make install需要强调的是make的时候会报错,显示各种找不到库文件,需要对makefile文件进行修改加入oralce的运行库地址

打开makefile,寻找INCLUDE,形式如下:

INCLUDES = -I/usr/local/php/include/php -I/usr/include/oracle/10.2.0.3/client

然后在末尾加上=”-I/usr/lib/oracle/11.1/client,然后重新make就会成功了。

4. 修改PHP.ini(/usr/local/php/etc/php.ini)

在extension_dir = “/usr/local/php/lib/php/extensions/no-debug-non-zts-20060613/”后增加一行:

extension = “oci8.so”

注意:要确保/usr/local/php/lib/php/extensions/no-debug-non-zts-20060613/ 该目录下有oci8.so文件

5.重启apache,让oci生效

6.在web目录下创建phpinfo.php文件在其中输入一下内容,并通过web访问


<?php
	phpinfo();
?>

如果找到OCI8的部分就说明OCI安装正常了,如下图所示\
\

说明oci8安装成功,接下来就可以使用php访问oracle数据库


补充:pdo_oci的安装

1)进入文件夹

# cd php-5.3.10/ext/pdo_oci/

2) 用phpize来扩展,文件夹内执行: phpize

[root@jinniu-test3 pdo_oci]# /alidata/server/php/bin/phpize
Configuring for:
PHP Api Version:         20090626
Zend Module Api No:      20090626
Zend Extension Api No:   220090626

3) 编译安装

# ./configure --with-php-config=/alidata/server/php/bin/php-config --with-pdo-oci=/usr/lib/oracle/12.1/client64
# make && make install

这里同样注意,如果发生错误,则修改Makefile,在其中的INCLUDES继续添加以下内容(根据自己的路径修改):

-I/usr/include/oracle/12.1/client64 -I/usr/lib/oracle/12.1/client64

执行顺利完成后,最后一行可以看到,已经将pdo_oci.so文件放入php的modules下,只需修改下php.ini文件,添加extension=pdo_oci.so即可